|
Part 1
Introduction
 Welcome Welcome
Veneering Basics
14 Good Reasons
Vacuum Press Uses
Vacuum Press Options
Questions & Answers
___________________
Part 2
DIY Vacuum Press Plans
Vacuum Press Chart
Project: EVS™
Project: EVS-2™
Project: V4™
Project: CRS™
Excel 1™
Excel 3™
Excel 5™
___________________
Part 3
Vacuum Bagging
Vacuum Bag Basics
Polyurethane vs. Vinyl
DIY Vacuum Bags
Connect the Bag
Bag Closures
Bag Platens
Breather Mesh 
Maintenance
DIY Frame Press
___________________
Part 4
Veneering Information
About Veneer
Veneering Glossary
Veneering Myths
Balancing a Panel
Veneer Glues
Veneering Tips
Substrate Materials
Flattening Veneers
A Sharp Veneer Saw
Jointing Veneers
Taping Veneers
Dealing with Defects
Curing Glued Panels
Veneering w/o Vacuum
Hammer Veneering
Iron-On Veneering
Veneer Storage
Amazing Bookmatches
Edgebanding Guide
Paper-Backed Veneer
Guide
___________________
Part 5
Miscellaneous Info
Vacuum Press FAQ
Veneering FAQ
Veneer Glue FAQ
Vacuum Forming
Vacuum Clamping Pedal
Vacuum Clamping Jigs
Vacuum Clamp Matrix
DIY Vacuum Manifold
Vacuum Press Gallery 1
Vacuum Press Gallery 2

|

There is an interesting and often over-looked convenience that comes from using a frame press for vacuum veneering and this idea has left me wanting to build one for years. It took a dozen drawings and nearly as many prototypes to finally come up with something that could be created in any woodworker's shop. The hours spent designing, building, and testing those prototypes has led to this frame press article. I hope it inspires you to build one and see how easy veneering is with a frame press.
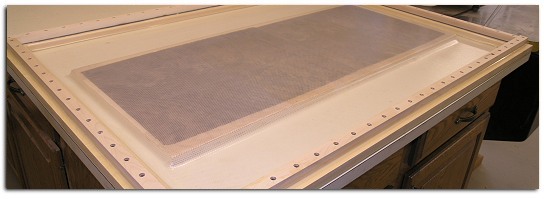
For all of the projects in my frame press, I use breather mesh on top and the plastic laminate outfeed table from my table saw as the bottom platen. The breather mesh on the project shown above is larger than the substrate so the sharp edges are protected from puncturing the polyurethane membrane. It's always a good idea to protect the polyurethane by using breather mesh or a rounded-edge top caul.
Benefits of a Frame Press
- Larger projects can be pressed without assistance from a helper
- Multiple small projects can be pressed at the same time - provided that you quickly prepare the substrate surfaces with veneer adhesive and get the veneer in place
- With a frame press, there is little worry of shifting the veneer on the work piece which is a somewhat common nuisance using a traditional vacuum bag
- This DIY frame press is easy and affordable to build
Typical Uses
- Production wood veneering where efficiency is critical
- Photo mounting and graphic arts applications
What You Need to Know Before Building
- In general, the larger you build your frame press, the greater the chance of perimeter leaks. Most leaks are easily resolved, but the bottom line is that a small frame press is much easier to troubleshoot than a large one. If you choose to build a large frame, you'll likely need to add cross braces to prevent the frame from bowing.
- I highly recommend building a small "test" frame press before you build a large workhorse frame. This will give you a chance to use the frame press and see if it is suitable for the amount and type of veneering you do most often.
- This is one project that must be built within reasonable tolerances for flatness. Warped or unstable wood used for building this project will undoubtedly result in poor performance.
- There are several commercial frame presses on the market which use a 3-dimensional shaped membrane that allows the pressing of dimensional projects such as curved drawer fronts, curved doors, etc. The polyurethane used in this project will expand 4 times its width and length to accommodate some mildly curved projects without the need for an expensive dimensional membrane.
- Let this article be a guide to your own plans and for more inspiration, check out Dave Lers' vacuum press table.
Materials List
This materials list is based on the reference frame size of 52" x 36" which is the size I used for the frame press in my shop. Keep in mind that even smaller projects will work inside a large frame press. 
- Maple lumber (preferably quartersawn)
- Dry wall screws (1 ¼", coarse thread)
- 5-Minute epoxy
- Silicone sealant
- Yellow glue
- Polyurethane sheeting (36" x 54")
- Brass tube adapter fitting
- Vacuum gasket tape for the lower seal (39' roll, 1/4" thick)
- Vacuuum gasket for the upper seal (82' roll, 1/8" thick)
- Breather Mesh
- Small piece of 1/4" soft tubing
- Brass barb tube union (1/4" barb version)
Sizing Up the Frame Press and Building the Table
If you are considering this project, I'll assume you are capable of building a table with adequate support in the legs, frame, and table top surface. Before you begin building the table, you'll need to determine the size of your frame press. This project can be built to any size so plan to build yours according to the largest size project you can reasonably imagine building but not forgetting the amount of shop space that the frame press will consume.
Don't forget, even small projects will work inside a large frame press.
Use My Measurements as a Starting Point |
In this project, I built a frame press which is 52" long and 36" wide. This is the outside measurement of the frame and is the size required for the table top surface. The inside measurement is 47" x 31" and this allows me to press a flat panel as large as 46" x 30" which is ideal for most of the veneered projects I build. Additionally, this allowed me to build a frame press by using only 1 linear yard of 54" wide polyurethane sheeting/film. |
Design your table to accommodate an appropriately sized frame. Be sure to add 6 inches to the length and width of the proposed project size to allow room for the frame part of the press. See the table below for an example.
Steps |
My Example |
Plan out the size of your largest flat panel project:
|
46" x 30" |
Add 6" to this length and width:
|
+6 +6
|
This is the size of the table top surface: |
52" x 36" |
Build the Table
I have a large out-feed table on my table saw that is covered with a plastic laminate. It is perfect for use as the table (bottom platen) of my frame press siince this it is smooth, non-porous, flat, and free of voids. I understand that many woodworkers may not have an out-feed table like mine so a table surface must be built.
- Build the legs and frame of the table and add additional center supports if necessary to prevent any table top sagging. Consider building shelves under the frame so you have a place to store veneering supplies and your vacuum press. Several people have also suggested building the table on hinges so that it can be mounted to a wall and folded down when not in use to save floor space.
- Build the table top from 2 pieces of ¾" thick sheet material. It is critical that the table top surface is smooth, non-porous, and perfectly flat. If any of these requirements are not met, the project will not be a success. Melamine board is great for this type of surface, btut you can also use MDF and cover it with a glossy plastic laminate.
Build the Frame
The frame is best made from hard maple lumber because it is relatively non-porous (it won't leak vacuum through the pores) and it is dimensionally stable so it's less likely to warp.
- Obtain 4/4 rough sawn maple and plane it down to ¾" in thickness.
- Clean up one edge of the board on a jointer and then use a table saw to rip lengths of lumber that are 2 ½" wide.
- There are numerous ways to join the boards together to make the frame. I opted for pocket holes but you could also use biscuits, tenons, or dowels to make the joint strong. Be certain that each board is flush with the next at the corners.
Keep This In Mind |
When I prepared to assemble the boards for my frame, I found they had warped just a bit. So I assembled the frame with each of the 4 maple parts so that the bow was facing down. When finished, none of the corners were touching my workbench top. To remedy this, I simply use a clamp at each corner of the frame to force the frame to seal against the table when in use. |
- Once the joints are dry, sand the frame smooth on both sides.
- Next use a router with a ¼" round-over bit to ease the inside edge of the frame. This should substantally increase of the life of the polyurethane sheeting.

- The maple lumber is mostly non-porous but under vacuum, the microscopic pores that are present can allow leakage. To remedy this issue, mix 3 parts of yellow glue with 1 part water and apply this mixture with a paint brush to all sides of the frame (inside edge, outside edge, top, bottom, ends). When the glue "sealant" dries, lightly sand the frame with very fine sand paper and apply one additional coat of sealant.
It has been suggested that shellac may have similar sealing capabilities but I have not tested this.
- Set the frame on your workbench so that the top side of the frame is visible. Use a pencil to mark a straight line across each of the 4 frame pieces that is 1/2" from the inside edge of the frame.

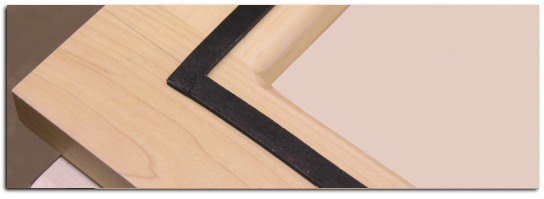
- Apply 1/8" thick vacuum gasket tape along the pencil line from the previous step. The tape should be applied as straight as possible. Note that the tape is applied on the side of the line closest to the outside edge of the frame. The purpose of this tape is two-fold. It creates an air-tight seal between the frame and the polyurethane film. Additionally, it softens the contact point between the polyurethane and the cleat to maximize the life of the polyurethane. Note that the vacuum gasket tape used in this step is comprised of four pieces (one for each side of the frame).
-
At this point, you'll need to make wooden "cleats" which will hold the polyurethane sheeting in place over the frame. Using ¾" thick lumber, cut 4 strips of wood that are 1" wide. They should be long enough to go around the frame using only 4 pieces. In the example above there would be two each of approximately 52" and 36".
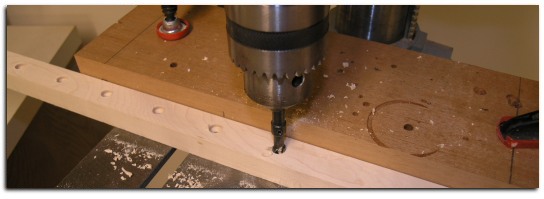
- Now drill pilot holes (preferably with a countersinking bit) with a 9/64" drill bit every 2" along the center of all four cleats.Remember to drill into the face that is 1" wide (not ¾" thick).
- Set each cleat on the frame so that half of the vacuum gasket tape is covered by the cleat and cut the cleats so that they fit the frame accordingly.
- Drill pilot holes into the frame using the hole in the cleats as a guide. Be very careful that you do not drill the pilot holes completely through the frame. It may be beneficial at this point to write an indexing number on the frame sides and each cleat so the holes line up perfect when you are ready to assemble this part.
- The next step is to drill a hole in the frame for the vacuum to flow through it. We will call this the "vacuum port". Select an area of the frame that works best for you to attach the lock-on connector from your vacuum press.
Use a 5/16" bit to drill a hole from the outside edge of the frame to the inside edge. Note that it is critical to avoid drilling the vacuum port directly under any of the pilot holes from the previous step. This hole must be drilled straight through, so if possible use a drill press.
- This next part is a bit tricky and it's not exactly a perfect process. Use a piece of masking tape to cover one end of the brass barb tube union without covering more than the first barb on the fitting. A bit of trimming of the tape will be needed. The purpose of the tape is to prevent the epoxy (that will be use to secure the brasss fitting to the frame) from getting inside the brass fitting.
- Now cover the hole on the inside of the maple frame with a piece of masking tape. This will prevent the epoxy that is used in the next two steps from oozing out.
- Mix up a small batch of epoxy. Stand the frame up so you can fill the vacuum port hole a little more than half way with epoxy.
- Before the epoxy cures, insert the taped side of the barbed fitting into the frame hole and press it all the way in. Remove any epoxy over-flow on the frame with a paper towel.
- Allow the epoxy to cure. Five-minute epoxy often needs more than five minutes to fully cure. I think it is best to wait an hour before continuing. Then remove the masking tape from the inside port on the maple frame.
- Now complete the pathway for vacuum flow through the frame. Use a 3/16" diamater drill bit for this part. Insert the drill bit through the brass tube union fitting and drill through the bit of tape on the end of the fitting. Continue drilling through the cured epoxy. Drill all the way through to the inside of the frame. If your drill bit is no long enough to bore all the way through, then try carefully drilling inward from the inside of the frame.
You may need to stop drilling to clear the drill bit a few times during this process. Some very light shavings of brass will be removed but hold the drill as straight as possible to keep this to a minimum.
- Slide the flexible tubing on to the barbed tube union fitting, and then attach the barbed side of the tube adapter fitting to the other end of the tubing.
- With a chisel, cut a channel approximately 1/8" deep from the inside frame vacuum port hole down to the bottom edge of the frame. This will allow a path of vacuum flow if the polyurethane sheeting pulls up against the inside edge of the frame.

- Next, cut a single piece of polyurethane film that is as large as the frame.
- Lay the polyurethane film over the frame loosely and attach one of the cleats to the frame with drywall screws. It's preferable to start with one of the long sides (if one exists). Attach the cleat to the frame with drywall screws by starting at one end and working your way towards the opposite side.
- The next cleat that is attached should be the one that is on the opposite side of the frame. At this time you may need a helper who can hold the polyurethane snug but not tight while you attach the second cleat. Even a light amount of slack is acceptable. Again, use drywall screws to completely attach the cleat to the frame.

- Select one of the remaining sides and attach the cleat. For the final side of the frame ask your helper again to hold the polyurethane film snug while you attach the last cleat.
- With a sharp razor knife, cut off any extra polyurethane that is on the outside of the cleat. It is very important to trim the excess as close to the cleat as possible.

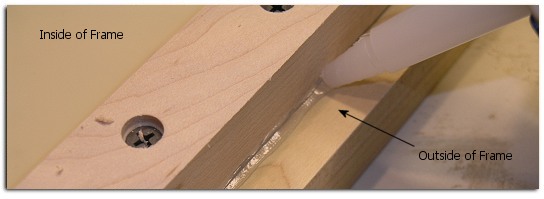
- Flip the frame over and you can now apply the 1/4" thick vacuum gasket tape to the sealing side (bottom side) of the frame. Simply apply one “track" of sealing tape around the frame close to the inside as shown in the picture. Try to do this in one piece. The tape is very flexible when the paper backing is removed and it will easily go around corners. On the straight parts of the track, do not stretch the gasket tape. It is easy to avoid stretching the tape if you leave the paper backing attached until you get to the corners.
The vacuum gasket tape offered at VeneerSupplies.com is a bit different than ordinary weather-stripping found at most hardware stores. The most important difference is that the vacuum gasket tape will return its original thickness after pressure is removed from the system. Weather-stripping generally will not return to its original thickness.
- A second track of gasket tape can now be applied to the outer edge of the frame bottom. Follow the instructions from the previous step to apply the tape keeping in mind the comments above about the corners and stretching the tape.
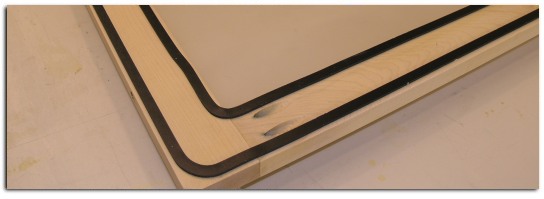
- Return the frame to its normal use position (with the top face of the frame upward). Apply a bead of silicone caulk to the outer edge of the 4 cleats and smooth it down with your finger or a smoothing tool. The bead of silicone is the secondary defense against leaks.
Getting Started with the Frame Press
To use the frame press, prepare your substrate with glue and apply the veneer. Set the panel in the center of the table and lay a piece of breather mesh over the project so that the entire project is covered. The polyurethane film is self-sealing against the frame press table surface so you'll need to make certain that at least some part of the breather mesh extends out to within a half inch of the inside of the frame. If not, the vacuum will pull down and seal the polyurethane against the table surface and leave a bubble of lower pressure on the veneer panel.
If your frame lays perfectly flat on your table top, it should pull down against the table and seal shut. For some, this may not happen and 4 or more clamps will be need to force the frame to seal off. By designing the frame with the bowed ends up (when applicable), you'll only need a clamp at each corner of the frame. Larger frames may require a clamp or two between each corner.
When the frame is ready for vacuum, attach the lock-on connector from your vacuum press to the brass fitting on the frame press. Turn the vacuum press on and watch the gauge needle. In a moment, the needle should begin moving as vacuum is created inside the press.

Storage
When not in use, store the frame part of the press carefully so as to avoid warping. If you built a dedicated table for your frame, simply store the frame on top of the table (without any clamps attached). Otherwise, consider storing the frame by hanging it on a wall. Do not lean the frame against the wall or it will surely warp.
Be sure to keep the gasket tape on the bottom face of the frame clean. The table top surface should also be kept clear of debris.
Some of the hard-to-find parts for the vacuum frame press can be found at VeneerSupplies.com which is my other woodworking website. I hope you have found this article interesting and useful. If you would like to contribute to the success of this article or any of the other articles on the JoeWoodworker website, please feel free to email me your comments and questions.
Lastly, if you have built a frame press with these plans, please send me pictures!
|


