JoeWoodworker
JoeWoodworker Veneer
The Official Website of this Non-Professional Woodworker ™

Topics: Vacuum Pressing and Trouble-Shooting
Total Questions and Answers: 85
Additional Topics: Click Here
Last Update: 8/21/23

General Vacuum Press Questions

  1. I want to build the vacuum press. Which version should I build?
  2. How is vacuum measured, what is CFM, and how much vacuum is needed for veneering?
  3. Can you measure the total pounds of pressure under the platens in a vacuum bag?
  4. Why is the Excel 5™ system faster than the Project: EVS-2™ system using the same pump?
  5. What if I can't pull the required vacuum within 10 minutes? And what is so important about "10 minutes" any how?
  6. How long does it take to draw the full amount of vacuum inside the bag?
  7. What size vacuum system should I look for?
  8. Will quick-connect fittings for compressed air work with vacuum?
  9. Is it safe to use PVC for the vacuum reservoirs? What about ABS?
  10. What will happen if I make the vacuum reservoirs larger?
  11. Do I have to use the "dual reservoir" design or can I use a single reservoir of comparable volume?
  12. Do I have absolutely have to use a vacuum reservoir for my vacuum press?
  13. Why should I buy parts and build a press when there are other companies offering similar pre-assembled units for the same amount of money? And since this pump will run continuously, how long will it last?
  14. Are there any good books about vacuum pressing available?
  15. Can a vacuum press be used for flooring inlays and medallions?
  16. Are there two different types of lock-on connectors on the VeneerSuplies.com website?
  17. What else could I use for the reservoirs besides PVC?
  18. Is it difficult to find the schedule 40 PVC for the reservoirs?
  19. How long does a "recharge" cycle last when the vacuum inside the system drops?
  20. How does altitude affect the vacuum press?New
  21. How often should my auto-cycling vacuum press recharge the vacuum level?
  22. Do the PVC reservoirs shorten the amount of time it takes to evacuate a vacuum bag?
  23. Can I use a vacuum press for clamping boards together face to face?

Electric Vacuum Press Questions

  1. Where can I find a vacuum pump?
  2. Can I use a small vacuum pump for an original EVS auto-cycling vacuum press system?
  3. I already own a vacuum pump. What do I need to use it for vacuum pressing?
  4. Why do I need the vacuum controller, gauge, reservoirs and other parts to build the EVS system?
  5. What kind of pump will work for a vacuum press?
  6. What is the problem with rotary vane pumps?
  7. What if I want something simple or if I want it run continuously?
  8. I've heard that some vacuum presses have a 'quick pull-down' scheme that allows you to release and quickly re-evacuate the press for minor adjustments. How can I accomplish this on my vacuum system?
  9. What's the purpose of the exhaust/bleeder valve on the continuous-run systems?
  10. Is there a way to make the auto-cycling press run continuously?
  11. Will the Project: EVS kit work with a 220v AC vacuum pump?

Air Powered (Venturi) Vacuum Press Questions

  1. With the Project: V4 system, will my air compressor run continually?
  2. How much air does the venturi version of the press require?
  3. Is a venturi system better than an electric pump system?
  4. Harbor Freight has a venturi pump rated at 28.3" of mercury and 4.2 CFM for only $17. Could this be used for a vacuum press? 
  5. What do I do if my air compressor can't keep up with the venturi on my vacuum press?
  6. My air compressor is rated in SCFM. How does that compared to CFM? New
  7. I've heard that multi-stage venturi units are the best vacuum generators. Is that true?
  8. Can I use the intake port on my air compressor to generate vacuum?
  9. Is there a major difference between the Plus and the Premium 5 for large vacuum bags?
  10. How many licks does it take to get to the center of a Tootsie Roll Pop?

Vacuum Bagging Questions

  1. Since vinyl for bag making is only 54" wide, what should I do if I need a vacuum bag that is 6' wide?
  2. How can I build a vacuum frame press?
  3. What is the difference between vinyl and polyurethane for vacuum bags?
  4. I'm on a budget and need to find a cheaper material for the vacuum bag. Any suggestions?
  5. Can I use Space Bags™ and a Food Saver™ for veneering?
  6. It's difficult to get everything into my large vacuum bag. What do you suggest?
  7. What can I do to make my plastic bag closure easier to snap onto the bag?
  8. How do I attach my existing vacuum press to the VeneerSupplies.com vacuum bag?
  9. Can I press multiple projects in a single vacuum bag at the same time?
  10. What size bag can I use with my vacuum press?
  11. Why does it seem like your platen system is different from everyone else's?
  12. Do I have to leave the bag connected to the vacuum press after it pulls full vacuum?
  13. How is the CFM of the vacuum source related to the size of the vacuum bag?
  14. Where can I find a 4' x 8' vacuum bag with the opening on the long side of the bag?
  15. How can I determine if my project is too wide or tall for a vacuum bag?
  16. Will I foul the finish if a coat of paste wax is applied to my platens?
  17. How do I know that I'm buying a decent vacuum bag?
  18. If I use a large vacuum bag for a small project, do I need to seal off the unused area inside?
  19. Can I use PVC cement from the plumbing aisle of the hardware store to make a vinyl vacuum bag?
  20. Can window screen material be used as breather mesh?

Miscellaneous Questions

  1. I'd like to use a refrigerant compressor from an old air conditioner. How do I make the connection from the compressor to the first part of the vacuum press?
  2. What kind of refrigerant compressor (from a refrigerator, freezer, etc.) works best and what brand should I look for?
  3. I'd like to use a refrigerant compressor for my system. Will the lack of oil in a compressor pump cause the unit to eventually burn out?
  4. Do you have any information about converting copper tubing to work with threaded fittings?
  5. When vacuum clamping, how do I ensure a good seal on porous woods like mahogany?
  6. How do I connect one of the VeneerSupplies.com vacuum presses to a OneWay vacuum chuck?
  7. Can I use a venturi system for vacuum chucking on a wood lathe?
  8. What is your favorite kind of cookie?
  9. How much vacuum is needed for vacuum clamping?
  10. What if I can't get adequate vacuum to clamp the panel safely?
 

Troubleshooting

  1. I hear air leaking from the bag stem connector. What should I do?
  2. D'oh...I punctured my vacuum bag or I have a leak somewhere. How do I fix this?
  3. How do I make my vacuum bag last as long as possible?
  4. How much vacuum leak should I expect?
  5. How can I find leaks in my vacuum press?
  6. I just wired my system as shown in the directions and it's not turning on. What should I do?
  7. How do I reset the vacuum gauge so the needle reads zero when there is no pressure on it?
  8. My system is complete and it holds pressure perfectly after the pump cycles off but it takes a long time for it to shut off and I can't get it any higher than 21" of Hg. Why is that? 
  9. My system was running fine for years but recently it started to cycle on and off very frequently. How do I fix this?
  10. My glycerin-filled vacuum gauge has an air bubble in it. Is it defective?
  11. Why does my auto-cycling system require me to tap on the vacuum controller to get it to cycle off sometimes?


General Vacuum Press Questions

G1: I want to build the vacuum press. Which version should I build?

It really depends on a wide array of factors. Here are some questions that must be answered. Each question is also a link to a page which will help you decide.

  1. Do you want a system that cycles on/off automatically or one that runs continuously?
  2. If you want your vacuum press to cycle on/off, do you want it to be powered by electricity or by compressed air?
  3. What is the maximum project size you estimate that you will want to put in a vacuum bag?
  4. Will your projects primarily be flat or curved?

Check out this link which contains a chart of the systems offered at VeneerSupplies.com. This chart discusses all of the critical aspects of selecting a vacuum press system.

(Back to top)


G2: How is vacuum measured, what is CFM, and how much vacuum is needed for veneering?

In vacuum veneering, the vacuum level is usually measured in terms of inches of mercury (" of Hg).

CFM or "cubic feet per minute" will only describe the speed at which the vacuum is created. It is a measurement of the amount of air volume that can be moved within a specified time frame. The "CFM" rating will not give you an idea as to the maximum possible vacuum.

For vacuum veneering, you'll need a minimum of 18" of Hg. However, the recommended pressure for most adhesives is 21" of Hg.

(Back to top)


G3: Can you measure the total pounds of pressure under the platens in a vacuum bag?

The "pounds per square foot" of total pressure can be calculated by multiplying the vacuum (in Hg) and dividing by 2; then multiply this number by the total square inches of one platen. Therefore, if you are applying 23" of Hg to a platen that is 1' x 2', the calculation is as follows:

(23 ÷ 2) x (12 x 24) = 3,312 total pounds of force

For more information, see this chart.

Another way to get a rough estimate of "pressure" on the platen is to simply multiply the vacuum level by 70 and then multiply that number by the number of square feet on the platen. Let's us a vacuum pump pulling 21" Hg on a 4' x 4' platen as an example:

(70 x 21) x (4 x 4) = 23,520 total pounds of force

(Back to top)


G4: Why is the Excel 5™ system faster than the Project: EVS-2™ system using the same pump?

According to the VeneerSupplies.com Vacuum Press Chart, the Excel 5 system evacuates a vacuum bag faster than the Project: EVS-2 system using the same Gast vacuum pump. There are two reasons for this difference.

  1. The vacuum reservoirs used on the EVS-2 kit are added air space that must be vacuumed in addition to the vacuum bag itself.
  2. The Excel system is very efficient with air flow and has less restricting parts than the EVS-2 system such as the Mac valve and check valve.

(Back to top)


G5: What if I can't pull the required vacuum within 10 minutes? And what is so important about "10 minutes" any how?

Ten minutes is the average amount of time that most users will have to get a project under vacuum before the veneer glue starts to set up. If the glue starts to set up before decent pressure is on the project, the veneer may not adhere correctly. Typically, the problem is a poor bond that doesn't show up until you apply a finish. The other remedy is to get a faster pump or a smaller bag to minimize the risk.

If you can't get the pressure on the project within 10 minutes...

  • Work faster
  • Use a smaller vacuum bag
  • Use a slower setting glue like Ultra-Cat™
  • Cool the air in the work shop (to slow down the glue "flash")
  • Add an additional pump
  • You can also use a Shop-Vac to pull some of the bulk air when using exceptionally large vacuum bags. The easiest way to do it is to tee in a ball valve to the vacuum line (between the reservoir and the bag). Then you'll need to rig up a few fittings to mate the Shop-Vac hose to the vacuum line. Most Shop-Vacs will only pull about 1.75" of Hg (provided the filter is clean) but this low pressure air in your bags could be a lot of volume and waste a lot of core vacuum time by the pump. As soon as the bulk air is removed, close the ball valve, then shut off the Shop-Vac (in that order).

    For an idea on building this contraption, see the box below.

From a vacuum press builder in Naperville, Illinois ...

"...I started out in the tool department, with an air compressor tee and connectors (I had trouble finding them, but Coleman makes them). Then I moved to plumbing and got a ball valve and a series of adapters to go from 1/4" to 1" pipe. Finally, I ended up finding a piece that's meant for a dishwasher connection that will let me connect the whole mess to my Fein shop vac with duct tape."

(Back to top)


G6: How long does it take to draw the full amount of vacuum inside the bag?

The length of time required to draw a full vacuum inside the bag will vary from one system to another. The speed of the pump is the most important factor. The "draw down" times for the vacuum presses offered at VeneerSupplies.com are listed on this chart.

(Back to top)


G7: What size vacuum system press should I look for?

Maximum pressure is the first critical factor. The vacuum source must be able to pull at least 18" of Hg. The second factor is air flow which determines the maximum size of the vacuum bag suitable for your system.

Project Minimum Requirements Minimum Requirements
4' x 4' or less vacuum bags 1 CFM for flat panels 3 CFM for curved panels
4' x 6' to 4' x 8' vacuum bags 3 CFM for flat panels 5 CFM for curved panels
4' x 9' to 6' x 15' vacuum bags 5 CFM for flat panels 9+ CFM for curved panels
Vacuum clamping 1 CFM for non-porous materials 3+ CFM for porous materials
Vacuum chucking on a lathe 1 CFM for very small projects 5 CFM for medium projects

More information about this topic can be found at this link.

(Back to top)


G8: Will quick-connect fittings for compressed air work with vacuum?

Unfortunately, most quick-connect fittings for compressed air will not work with vacuum. There are 4 common types of these fittings for compressed air and I've tried each. I also tried different brands of the same types of connectors. Some held vacuum if the hose and coupling was held perfectly inline with the coupler but leaked as soon as the hose was moved off-center. Others held vacuum during some of the tests and then leaked during subsequent testing.

I've only found one quick-connect system that works perfectly for vacuum and I now offer it at VeneerSupplies.com for a reasonable price.

(Back to top)


G9: Is it safe to use PVC for the vacuum reservoirs? What about ABS pipe?

PVC Info Yes, PVC pipe that meets ASTM D1785 or D2241 standards can withstand vacuum. According to research conducted by Dr. R.K. Watkins at Utah State University, vacuum levels cannot collapse PVC pipe that is exposed to normal service temperatures. In fact, quick calculations show that even under conditions of elevated operating temperatures of 100oF, the pressure required to collapse most PVC pipe is greater than atmospheric. In other words, the pipe can withstand a complete vacuum. For more information, please see this article from the Uni-Bell PVC Pipe Newsletter.

Cell Core PVC
Sometime called "hollow core" PVC, Cell core is not recommended for vacuum.

Schedule 80 PVC
Solid core schedule 80 PVC can also be used for vacuum according to George Fischer Piping Systems. Click here to see their conclusion.

ABS Pipe
After a phone conversation with a tech a Uni-Bell, I can not recommend ABS pipe for the vacuum reservoirs. However, some users have not followed this advice and used ABS anyhow. None of these users has contacted me indicating a problem and there are pictures on the vacuum press gallery page of systems built with ABS pipe. It would appear that ABS 2112 and ABS 1316 could possibly withstand vacuum. See this page for details.

More PVC InfoAbout Uni-Bell
Uni-Bell has served the engineering, regulatory, public health and standardization communities with integrity and considerable measures of both time and resources. Whenever questions have arisen relative to PVC pipe performance, Uni-Bell members, through their Association, have responded. Pipe designers and installers have been provided with much needed research from Uni-Bell regarding pipe deflection, ultraviolet aging, tapping, cyclic surge performance, in-service durability, and safety.

(Back to top)


G10: What will happen if make the vacuum reservoirs larger?

The most important thing to know is that a larger reservoir does not increase the speed at which the system can reach full vacuum. If you charge the reservoirs with vacuum before opening the line to the vacuum bag, you will only increase some of the initial vacuum draw on the project however, the total time to reach full vacuum will be no different than a system without a larger (or additional) reservoir. The only exception to this is when the project and vacuum bag are very small and the additional reservoir is extremely large. I've never seen a system capable of using only its pre-charged vacuum to bring any size bag to full vacuum.

Keep in mind that if you do not charge the reservoir system with vacuum before starting flow to the project, then a larger (or additional) reservoir will increase the amount of time to reach full vacuum.

The only possible benefit to a larger reservoir is that it will lengthen the amount of time between cycles but it will also make the recharging cycles take longer. Conventional wisdom says that the vacuum press should be more durable if it cycles on less often but the truth is that the moving components on the Mac valve and vacuum switch are rated for a hundred thousand cycles or more. So the perceived benefit of the larger tank isn't really earth shattering.

(Back to top)


G11: Do I have to use the "dual reservoir" design or can I use a single reservoir of comparable volume?

There is no problem changing the tank design from a dual to a single reservoir design. You could also use a triple or quad reservoir design if you wish.

(Back to top)


G12: Do I have absolutely have to use a vacuum reservoir for my vacuum press?

The vacuum controllers I offer should not be used without a vacuum reservoir. The vacuum reservoir serves as a storage buffer and without it your system will constantly turn on and off. This will lead to premature failure of any pump.

(Back to top)


G13: Why should I buy parts and build a press when there are other companies offering similar pre-assembled units for the same amount of money? And since this pump will run continuously, how long will it last?

Despite both kits and pre-assembled systems achieve similar results, there are several inherent quality differences between them. I've seen many of the low-tech vacuum systems in operation and I'm sure they work well but their systems consist of a cheap vacuum pump and shoddy accessories that often prove less than durable. The vacuum pumps offered at VeneerSupplies.com are thoroughly tested to the extent at which it borders on "torture". I've even run pumps at full vacuum for two days in my car in the hot summer sun here in Maryland, and I'm convinced these are some of the best vacuum pumps available.

Additionally, the vacuum press parts at VeneerSupplies.com are all nonproprietary so you can add and replace parts if needed. You can also modify the unit to do other things. The kits are easily adaptable for use with vacuum clamping and templating. The kit design allows you to attach additional bags with simple T-fittings found at the hardware store if needed.

The VS vacuum press kits require a bit of your time to assemble, but in exchange you get heavy duty components adapted from other industries (at industrial level specs); not cheap parts that were designed to fail so a huge corporation can maintain a healthy profit. A good example of this is the VS vacuum gauge. On other systems, a plastic gauge is used that has nothing to prevent needle fluttering. This movement makes it almost impossible to accurately read the gauge. The gauge used on VS vacuum press kits is stainless steel and it has a built-in damper that dramatically reduces needle fluttering.
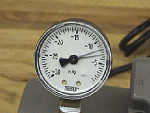
Vacuum Gauge Flutter
Needle Flutter

And unlike the bare-bones kits offered elsewhere, our Excel™ vacuum press kits have a fully adjustable vacuum range for delicate projects. You can dial it in for any pressure from 560 to 1700 lbs of pressure per square foot.

The truth is that we (my wife and I) don't have the "overhead" as other companies. We ship orders from a small rented warehouse so we don't need the high financial return from the sale of the systems and components. So what you get is a heavier duty system at the same price that can be modified and adapted as your veneering skills expand. For more information, check out this page... "Why Build A Vacuum Press"   

  Excel 1 ™ Vacuum Press Kit . Generic Vacuum Press Kit
Pump 1.4 CFM   .8 to 1.0 CFM (typically)
Tubing 1/2" O.D. double-braid reinforced vinyl   5/16" O.D. vinyl
Filter High-efficiency, high-flow   None (!)
Adjustable Fully adjustable to prevent crushing and starving the glue surface   No. User must use full force.
Pressure 560 to 1700 lbs/sqr ft.   1700 lbs/sqr ft.
Gauge Stainless steel   Plastic
Bag Connection Brass lock-on connector   Vinyl friction fit
Clamping Kit Available and inexpensive   Not available
Retail Price less than $300   $479.00 (but often includes a bag)

How long will the pump last?
The manufacturer says that if the pump were left running continuously, it would be two years before it would need to be rebuilt.

(Back to top)


G14: Are there any good books about vacuum pressing available?

Yes! There are three exceptional books on veneering that would make great additions to a woodworking library.

The Complete Manual of Wood Veneering by William Lincoln
It reads more like a high school text book than a "manual" but it is very thorough and well organized. It's currently out of print but it does show up on eBay rather often.

Mike Burton BookVeneering: A Foundation Course by Mike Burton
This book was out of print and hard to find for quite a while but it was revised and published again in June of 2006. The new version includes a section on marquetry which was a great complement to the other chapters. Mike Burton covers various forms of veneer application including vacuum pressing, iron-on veneering, and more traditional methods. The book also includes a few well designed veneering projects. One thing that I really enjoyed is the author's down to earth writing style. He writes as if he was speaking directly to you and his comments are insightful and often downright hilarious.

Jon Benson BookWoodworker's Guide to Veneering & Inlay by Jonathan Benson
I have admit that this book is probably going to be one of the de facto standards for veneering guides. The author clearly explains nearly every aspect of veneering from log to finished project without over-stressing any particular concepts. This keeps the reading enjoyable, interesting, and wonderfully helpful. If you're interested in vacuum bagging your veneered projects, Jonathan Benson's book has it covered.

(Back to top)


G15: Can a vacuum press be used for flooring inlays and medallions?

Yes. I've helped several inlay and medallion craftsmen build a frame press system for this purpose.

Since some species of wood used for flooring are porous, air will leak into the system. If you have a cycling vacuum press such as the Project: V4 or EVS-2 system, you can easily wire in a switch to convert it to run continuously.

(Back to top)


G16: Are there two different types of lock-on connectors on the VeneerSupplies.com website?

Yes! A new lock-on connector was introduced in February of 2020 that is a nice improvement over the previous version. More information can be found on the product page.

(Back to top)


G17: What else could I use for the reservoirs besides PVC?

There is no easy and safe answer to this question. I have seen vacuum press reservoirs made from fire extinguishers, scuba tanks, air compressor tanks, and many other materials. Ultimately, the question is of safety. None of these are considered safe for vacuum unless the manufacturer specifically says so.

The only affordable material that is scientifically proven to be safe for vacuum is schedule 40 or 80 solid core PVC.

Thanks to Troy Delnicki of Faribanks Alaska for this tip...
If your local hardware store does not have 3" schedule 40 PVC in the plumbing department, check the electric aisle instead. They might have schedule 40 PVC in electrical conduit (gray) which is very affordable. Then just get the white schedule 40 PVC caps in the plumbing aisle.

(Back to top)


G18: Is it difficult to find the schedule 40 PVC for the reservoirs?

In the eastern and midwest areas of the US, schedule 40 PVC pipe can be found at most plumbing suppliers. I have heard from several west coast residents that schedule 40 PVC can only be found at "specialty" plumbing dealers.

Canada appears to have a good supply of schedule 40 PVC.

Schedule 40 PVC pipe is not available in Australia. I have been advised that the Australian equivalent is Class 12 Water Pressure Pipe. Only specialty irrigation/pipe centers handle it. It is rather expensive so consider purchasing the PVC kit from the VeneerSupplies.com website to save a few bucks.

(Back to top)


G19: How long does a "recharge" cycle last when the vacuum inside the system drops?

There is no accurate answer to this question but it's probably not that important since the recharge cycles are generally very short. I have a venturi powered system that only take 5 seconds to recharge my 4x4 vacuum bag. I also have an electric vacuum system that take 30 to 40 seconds to recharge. In either case, it's not a long enough cycle to cause concern.

The length of the recharge cycle is affected by

  • The sensitivity (dead band/differential) of the vacuum switch
  • The size of the vacuum bag
  • The size of the vacuum reservoirs

(Back to top)


G20: How does altitude affect a vacuum press?

The general rule of thumb is a loss of 1" of Hg for every 1,000 feet above sea level. A pump that delivers 25" of Hg, will actually provide 20" of Hg at 5,000 feet above sea level. This amount of vacuum would be fine for veneering but you might find that it takes more time to achieve 20". In that case, simply turn back the shut-off point on the vacuum controller. A setting of 17" to 18" of Hg will still yield a good veneered panel. For a more detailed chart describing the effects of altitude on vacuum levels, please click here.

(Back to top)


G21: How often should my auto-cycling vacuum press recharge the vacuum level?

With my own vacuum press system, the system recharges every 60 to 75 minutes when not attached to a vacuum bag. Some users have reported that their systems recharge every 10 to 15 minutes and others have said they could go an entire day without recharging. It's important to remember that when the system is attached to a vacuum bag, the cycle frequency will increase. How much of an increase depends on several factors such as bag size, age of the bag, and how well the closure is attached to the bag.

So, what is an acceptable frequency of vacuum recharging? That really depends on you. Some users spend a lot of time tracking down sources of leaks. They are often successful. Other users are fine with the system recharging more frequently. It's just a matter of personal preference.

(Back to top)


G22: Do the PVC reservoirs shorten the amount of time it takes to evacuate a vacuum bag?

If you precharge the reservoirs with vacuum (by closing the vacuum valve), then the reservoirs have no effect on the amount of time that it takes to draw the air out of a vacuum bag. The purpose of the reservoirs is simply to minimize the frequency of the on/off cycling of the vacuum pump.

(Back to top)


G23: Can I use a vacuum press for clamping boards together face to face?

At sea level, a typical vacuum press can put down the equivalent of 1,750 lbs of pressure per square foot. If the boards are flat, then this is generally considered more than adequate for a project where two sheet materials such as plywood or MDF are being glued together face to face. This also is true for gluing solid wood boards together.

(Back to top)


Electric Vacuum Press Questions

E1: Where can I find a vacuum pump?

Of course, I offer pumps at the VeneerSupplies.com. You can also look on the Internet for "used vacuum pumps". Be careful with used and salvaged units because vacuum pumps can come from a variety of hazardous conditions such as those used in medical systems and hazardous waste removal.

Be aware that the Project: EVS-2 kit on the VeneerSupplies website now includes a vacuum pump.

(Back to top)


E2: Can I use a small vacuum pump for an original EVS auto-cycling vacuum press system?

Project CRS KitYou can use the original Project: EVS system with many pumps, but there is no problem with letting smaller pumps run for the whole time the veneer is being pressed. Most of these pumps are designed to run continuously and they use very little electricity while running. VeneerSupplies.com offers a Project: CRS kit to turn just about any pump into a continuously running vacuum press system with full vacuum adjustment. Click here for details.

(Back to top)


Vacuum Press IdeaE3: I already own a vacuum pump. Will it work with the original Project: EVS system?

The original Project: EVS kit allows you to create an auto-cycling vacuum press system with your vacuum pump. The instructions for the kit can be found here.

If your vacuum pump meets the specifications below, then it will work with the original Project: EVS kit. Most vacuum pump manufacturers have great customer service and if you provide them with the model number of your pump, they can give you these specifications:

Specification Description
Ideal Spec
Port Size The thread size of the vacuum and exhaust ports
1/4" NPT
Maximum Vacuum The max vacuum level expressed in "inches of Mercury" (or Hg)
21" Hg
Start-Up Amps The amperage draw when the pump first starts up
< 10
Vacuum Flow The flow of air (or CFM) at 0 pressure
3 +

Project EVS KitPort Size: Make sure the vacuum port on the pump has 1/4" NPT threads. The kit is designed to use this thread size. If your pump has a different thread size, you'll need an adapter to change it to 1/4" NPT. These can be found at most hardware stores.

Maximum Vacuum: Generally speaking, 18" Hg is the minimum vacuum level for veneering. However it's ideal to use a vacuum pump capable of at least 21" Hg. If you are more than 1,000 feet above sea level, even more vacuum is needed.

Vacuum Controller RelayStart-Up Amps: Some vacuum pumps will have a label displaying the operating amperage. However, the most important specification is the "start up" amperage. The vacuum controller on the EVS kit will handle up to 10 amps. If your pump draws more than 10 amps at start up then you must use a relay to handle the high-current switching. In most cases, the start up amperage is three times the running amperage but you will have to confirm this with the manufacturer of your vacuum pump.

Vacuum Flow: If your pump has a flow rating of more than 4 CFM, you will need to add a vacuum damper to prevent the vacuum controller from turning on and off rapidly. This chattering will quickly damage the pump. Keep in mind that your vacuum pump's CFM rating effects the maximum bag and project size. Learn more by clicking here.

Additional Notes

  • Rotary vane vacuum pumps such as the Gast 1023 and 0523 vacuum pumps have been a nightmare for me. I have found them difficult to fine tune for vacuum pressing and they draw a tremendous amount of power when they start up. There are much better choices in vacuum pumps than rotary vane. I am well aware that several other companies are using rotary vane pumps for their vacuum press systems.
     
    If you are using a rotary vane pump, you will at least need the relay and vacuum damper parts along with your original Project: EVS kit. I offer ZERO support for troubleshooting vacuum press systems built with rotary vane pumps. If you try to use this kit with a rotary vane pump, please know that I will not be able to help you troubleshoot problems. You waive your right to return the kit if you are using it with a rotary vane pump.
     
  • Oil-bath pumps such as those from Robin-Aire are typically used for refrigerant systems can be problematic. This type of pump has a tendency to emit a plume of oil mist into the air. For most users, this can be a huge issue that causes problems with the finish that is applied to the veneered project or any other unfinished project in the vicinity of the pump. I've been informed that there are filters to capture the oil mist from the pump but I don't know where to get them or how well these filters work.
     
  • If you thought you had the perfect pump, but now you are not certain, consider getting a vacuum pump on the VeneerSupplies.com. They are very affordable and quite reliable. I've had a ton of great comments about these pumps.

(Back to top)


E4: Why do I need the vacuum controller, gauge, reservoirs, solenoid valve, and other parts to build the EVS /EVS-2 system?

In a perfect world, you'd only need to connect the intake of the vacuum pump to a tube which would be connected to a vacuum bag to have a working vacuum press. All of the "extras" on the Project: EVS and V4 systems might seem a little unnecessary but each has a place and purpose on an auto-cycling system.

The Vacuum Gauge
Obviously, the gauge shows the user the vacuum level inside the system. More importantly, it shows the user if there is a leak. When the system cycles off, the needle on the gauge will move subtly, but it's enough to indicate when a leak is present.
Vacuum Gauge

The Vacuum Controller
This the critical piece of the puzzle. The vacuum controller monitors the vacuum level and cycles the system on and off as needed. It is essentially the "brains" of the system. For heavy duty vacuum pumps, the vacuum controller simply controls power to a relay that does the high-current switching.
Vacuum Controller

The Vacuum Reservoirs
If you are going to have a system that cycles on and off, then you certainly don't want it to cycle too frequently. This is bad for the pump and it's annoying. If you have an air compressor in your shop, you certainly understand that a larger tank on an air compressor means that it will cycle on less frequently. The same is true of the vacuum reservoirs.
Vacuum Reserviors

The Vacuum Valve
The vacuum valve allows you to pre-charge the reservoirs with vacuum which will give you a short burst of vacuum in the initial pull-down of the vacuum bag.
 
Vacuum Valve

(Back to top)


E5: What kind of pump will work for a vacuum press?

Rebuilt Vacuum PumpAny vacuum pump that can pull 21" of hg will work with the system. Vacuum presses can be made from oil bath, diaphragm, and piston based pumps. Based on experience, I do not recommend rotary vane vacuum pumps. I have found them difficult to fine tune for vacuum pressing and they draw a tremendous amount of power when they start up. There are much better choices in vacuum pumps than rotary vane.

(Back to top)


E6: What is the problem with rotary vane pumps?

Rotary vane pumps run hot and if your vacuum bag has a leak, the pump will run nonstop and could over-heat. Most rotary vane pumps have a thermal protection circuit that shuts off the pump if the system gets too hot. A leaky bag plus a shut-down pump equals a failed veneer panel. The vanes used in this type of pump are fragile and debris going through the vanes is potentially troublesome because the tolerance in the vane housing is very tight. A service tech at Thomas Pumps sent me an email saying they had seen failures caused by the vanes getting gummed up with chemicals off-gassed by certain adhesives. He had never seen a piston or diaphragm pump with this type of trouble.

I am aware that almost every vacuum press manufacturer is using a rotary vane pump and I'm not saying anything bad about those systems. My experiences with our customers and my own vacuum press systems are all good ones. I've stuck with piston and diaphragm pumps for 8 years even though I've had the opportunity to buy hundreds of rotary vane pumps for pennies on the dollar.

My opinion is that rotary vane pumps are very durable when used for the right application, but I'd rather have a piston or diaphragm pump in a dusty workshop.

(Back to top)


E7: What if I want something simple or if I want it run continuously?

Consider the Project: CRS builder's kit or the Excel 1 vacuum press system offered at VeneerSupplies.com.

(Back to top)


E8: I've heard that some vacuum presses have a 'quick pull-down' scheme that allows you to release and quickly re-evacuate the press for minor adjustments. How can I accomplish this on my vacuum system?

Click here to orderAll of the auto-cycling kits offered at VeneerSupplies.com come with a vacuum valve that is used between the reservoir and the vacuum tube that attached to the vacuum bag. You can close the valve and turn on the vacuum press to pre-charge the reservoirs with vacuum.

If your project is not sitting properly inside the vacuum bag, you can easily shut off the vacuum without losing the pressure inside the reservoirs. You can then re-adjust the material and re-connect the bag to the system. After you open the vacuum valve, the buffer of vacuum will then transfer to the bag and give you a short burst of vacuum. Of course, the press will start to recharge the reservoirs almost immediately but at least you still get that slightly faster initial pull down.

(Back to top)


E9: What's the purpose of the exhaust/bleeder fitting on the continuous-run systems?

The exhaust fitting essentially serves as a vacuum bleeder. The core reason is that it allows you to easily adjust the pressure in the system. But it’s important to note that the bleeder fitting also allows the pump to circulate a little bit of fresh air through it so some of the off-gases from adhesives are allowed to escape.

The pumps are continuous duty, but they can generate some heat which can cause the off-gases to create a build up of residue. This residue will clog the head-valve inside and reduce the efficiency of the pump. And eventually, the residue will harden the flexible surface of the diaphragm and cause it to crack prematurely.

Piston based pumps are also prone to residue build up which can cause the pump to over-heat as the friction on the cylinder walls builds up.

(Back to top)


E10: Is there a way to make the auto-cycling press run continuously?

Yes, it's quite simple to make a cycling vacuum press run continuously. Simply wire a switch that jumps the connection between to the common and normally closed terminals on the vacuum controller. A standard light switch will work fine for most systems. When engaged, the light switch will bypass the vacuum controller's switching and allow the electrical current into the system regardless of the vacuum level in the reservoirs. When disengaged, the system will return to auto-cycling on and off to maintain the pressure set by the vacuum controller. Our kit instructions include details for wiring in a switch to make the system run continuously.

(Back to top)


E11: Will the Project: EVS kit work with a 220v AC vacuum pump?

The Project: EVS kit is designed for use with 120v AC vacuum pumps only. I do not offer parts or support for pumps that draw more than 120v AC.

(Back to top)


Air Powered Vacuum Press Questions

A1: With the Project: V4 system, will my air compressor run continually?

No. Think of it this way... the air valve is a gate that controls the flow of air from the air compressor only when the vacuum controller recognizes the need for additional vacuum. The venturi typically pulls vacuum very quickly. In fact, the reservoirs tanks will achieve full vacuum in just 30 seconds in most cases. After that, the compressed air is shut off automatically and the system only cycles on again when vacuum levels have dropped by 2 to 5" Hg.

(Back to top)


A2: How much air does the venturi version of the vacuum press require?

Venturi
Model
Vacuum
Flow
Air Requirement
at 80 PSI
Air Requirement
at 90 PSI
Mini™
.5 CFM
.8 CFM
1.2 CFM
Basic™
1.2 CFM
1.8 CFM
2.2 CFM
Plus™
3.2 CFM
4.8 CFM
5.5 CFM
Premium 5™
5.5 CFM
7.8 CFM
9 CFM
Premium 9™
9 CFM
12.5 CFM
14 CFM

Smaller air compressors may require a separate reserve tank that will easily piggy-back to your existing tank and give you more pressure in reserve to get the initial vacuum created in the bag. If the pressure coming out of the air compressor drops below 80 PSI, the air coming out of the compressor will just be wasted. It really needs the full 80 PSI to work correctly and often the extra air-tank helps if the air compressor is a bit short of the required CFM for the venturi.

If the air compressor drops below 80 PSI, a temporary fix is to shut off the venturi press until the compressor has reached at least 90 PSI. Then turn the system back on and let it generate vacuum again until it is below 80 PSI. By doing this, it may take longer to pull a full vacuum but you will not lose any noticeable vacuum inside the system because of the check valve.

Once the vacuum press cycles off by itself, it won't use much air from the compressor to recharge the vacuum so you won't have to baby sit it any longer.

The venturi units can handle up to 120 PSI but the recommended pressure is 80 to 105.

(Back to top)


A3: Is a venturi system better than an electric pump system?

Both systems work almost identically but there are some details that might swing your vote in one direction or another. The venturi systems are easier to build, cost less, and have less moving parts. Additionally, you'll find the a 3 CFM venturi can draw a full vacuum somewhat faster than a 3 CFM electric vacuum pump. Click here for more information.

(Back to top)


A4: Harbor Freight has a venturi pump rated at 28.3" of mercury and 4.2 CFM for only $17. Could this be used for a vacuum press? 

I have tried that same venturi with a vacuum press for several years before I realized how inefficient it was. In May of 2005, I sent one out for lab testing and the results were surprisingly disappointing.
  • First, HF rates it at 4.2 CFM. This the air consumption, not the vacuum flow. What's important is that the true air consumption was almost 8 CFM.  In fact, I sent them two more units for testing because I thought the first venturi I sent had to be defective. It wasn't. They all gulped up 8 CFM of air to pull full vacuum.
  • Second, they only pulled between 1.75 and 2.05 CFM of vacuum flow. That's a loss co-efficient of 75 percent.
  • Lastly, there is absolutely no easy way to muffle the sound that these emit without further reducing its capability.

I was hesitant to add this to the FAQ but I don't want to see anyone waste their money with the HF venturi. I know it may sound like I'm just trying to be "Joe Salesman" but in my opinion the HF unit is not worth the savings over buying the new model venturi that's on the VeneerSupplies.com website.

(Back to top)


A5: What do I do if my air compressor can't keep up with the venturi on my vacuum press?

Check the owner's manual of your air compressor before purchasing a venturi-based vacuum press. Then make sure your air compressor's output capacity meets or exceeds this flow required by the venturi. If your air compressor falls slightly short of the venturi needs,
you can "baby sit" the system. Here's how...

If the air compressor drops below 80 PSI, a temporary fix is to shut off the venturi press until the compressor has reached at least 90 PSI. Then turn the system back on and let it generate vacuum again until it is below 80 PSI. By doing this, it may take longer to pull a full vacuum but you will not lose any noticeable vacuum inside the system because of the check valve.

Once the vacuum press cycles off by itself, it won't use much air from the compressor to recharge the vacuum so you won't have to baby sit it any longer.

(Back to top)


A6: My air compressor is rated in SCFM. How does that compared to CFM?
The formula to convert SCFM to CFM is complicated. If your compressed air is around 68°F and has a relative humidity of 36%, then SCFM and CFM are approximately the same. However, I recommend estimating this cautiously, so it may be best to multiply your SCFM rating by .95 to get a reasonable expectation of CFM. Click here if you really want to know more about this.

(Back to top)


A7: I've heard that multi-stage venturi units are the best vacuum generators. Is that true?

A multi-stage or multi-chamber vacuum pump is made up of 2 to 4 separate in-line venturi’s that work in sequential stages using the same input air supply. Each chamber is designed to function up to a specific vacuum level. When a chamber reaches a prescribed vacuum level, a flap automatically closes off that chamber. This process continues until only the first chamber is drawing vacuum, thus the multi-stage effect. Learn more by clicking here.

Vac Pro VenturiWhat's important to note is that most vacuum lifting applications work above 9" Hg. Typically, chambers 2, 3, and 4 have shut down before reaching 9" Hg, the multi-stage pump literally turns itself into an inefficient single-stage pump. The problem with the multi-stage pump is that it must maintain a high velocity of flow in chambers 2-4. Air consumption remains high, even though vacuum flow has decreased by almost 75%. In addition, if a vacuum filter is not used, and debris or dust enters the multi-stage pump, it can clog the flap valves requiring repair and/or replacement, downtime and loss of production. The Vac Pro units are highly efficient single stage vacuum generators. In most cases, the Vac Pro flow rates at the upper levels exceed multi-stage pumps by a factor of 2 to 7 times, while air consumption remains constant!

(Back to top)


A8: Can I use the intake port on my air compressor to generate vacuum instead of using a venturi?

According to Campbell Hausfield, that would be a big mistake. The internal valves will eventually bend if there is back pressure against the intake. This will lead to poor compressor performance and eventually total valve failure.

(Back to top)


A9: Is there a major difference between the Plus and the Premium 5 for large vacuum bags?

The Plus version of the system will handle a 4x8 flat panel with no problem if you work at a reasonable pace. The benefit of the Premium 5 is that it buys you some extra time during the glue-up process (before the bag is sealed shut). If you run into an issue while getting the project in the bag, the glue could start to set up. If that happens, 5 CFM version will pull the bag down to the project faster and reduce any chance of getting a poor bond.

The question is how much time does it buy you. There is no easy answer there since it depends on a lot of factors related to the project shape, substrate type, and veneer species. For example maple needs a very "wet" glue to make a good bond. On the other hand, walnut will bond nicely in most cases even if the glue is already starting to set up before full vacuum is achieved.

(Back to top)


Mr. OwlA10: How many licks does it take to get to the center of a Tootsie Roll Pop?

Let's find out.
One. Two-ooo. Three.

Three!

(Back to top)


Vacuum Bagging Questions

VB1: Since vinyl for bag making is only 54" wide, what should I do if I need a vacuum bag that is 6' wide?

Vinyl Vacuum Bag MaterialYou can make a vacuum bag of any size. I have made huge bags by making two "tubes" of vinyl and gluing them end to end. I have also glued two pieces of vinyl 54" wide by 6' long together (side by side) and then rolled the edge together to make a 4' x 6' bag. Using vinyl cement, you can fuse together as much vinyl as necessary to get the size and shape you need.

(Back to top)


VB2: How can I build a vacuum frame press?

It took a dozen drawings and nearly as many prototypes to finally come up with something that could be created in any woodworker's shop. The hours spent designing, building, and testing those prototypes has led to this frame press article. I hope it inspires you to build one and see how much easier vacuum pressing is with one in your shop.

(Back to top)


VB3: What is the difference between vinyl and polyurethane for vacuum bags?

Polyurethane vacuum bags last significantly longer than vinyl bags. With everyday use, vinyl has a tendency to develop tears and pinholes (which can be repaired). Polyurethane bags can withstand much more use and abuse because it is chemically engineered to be elastic. This elasticity is what makes it more puncture resistant than vinyl and allows it to retain its shape even when stretched to the extremes which makes it good for curved projects. Additionally, polyurethane has a much greater "memory". In other words, it goes back to its original shape after being stretched.

For more information about polyurethane vs. vinyl for vacuum bagging, click here.

(Back to top)


VB4: I'm on a budget and need to find a cheaper material for the vacuum bag. Any suggestions?

If you have access to an old waterbed mattress, you're in luck. The mattresses are usually made of a decent grade of vinyl. The only downfall is that most of them are not clear so seeing the panel and platens is not possible. For seasoned press users, this may not make much difference but for others, it may make things more difficult.

There have been reports that inflatable air mattresses will also work for vacuum bags but I have not tested this.

I've also received emails from users who have built a vacuum bag with PVC shower pan liner available at most home centers. It's a thick vinyl material that is gray in color and is usually sold by the linear foot. It's not really cheaper than standard 30 mil vinyl, but if you have access to some scraps it will make a nice vacuum press bag. With this material, you can cement the bag with Oatey PVC cement.

(Back to top)


VB5: Can I use Space Bags and a Food Saver for veneering?

From Stuart Jackson...
I started with "Space Bags", since we had some in the house from vacation. They come in pretty big sizes and are inexpensive enough to be semi-disposable. The material is strong and they are very air-tight. I just grafted a hunk of tubing into the bag and sealed it with 5-minute epoxy. I used it with an hand- powered vacuum pump before I spent the money on a real pump. The hand pump does take a bit of work, but you can do a good job on small panels. It's a good way to give veneering a try without spending a whole lot of money or messing with making a bag from scratch.

Space Bags for Veneer?

Veneering with Space Bags?

From Bobby Tonsly...
Trying to be cheap, I decided to use one of my wife's clothing space bags for vacuum pressing a panel. The hard part was trying to get the vacuum tube to connect to the bag. I never got a connection that was completely free of leaks but I did manage to get the bag down to 21" of vacuum. The press ran almost continuously. The good news is that the panel turned out well but on the next panel, the bag developed a tear. Of course, the wife was ticked off but at least they are cheap. I ordered her a replacement bag and immediately after that, I ordered a real vacuum bag.

From Joe Hillenborough...
I placed a vacuum gauge inside of a Food Saver bag and sucked it down with the Food Saver unit. It doesn't draw enough vacuum to do veneering. I guess that why they don't call it a "Veneer Saver".

From Dave Purdy...
I used a FoodSaver to create the vacuum, not sure what the Hg was but it seemed to work quite well as it bent four 1/8" 3-ply pieces of Baltic Burch. The only bummer was getting up every 10 minutes to re-vacuum the bag.

(Back to top)


VB6: It's difficult to get everything into my large vacuum bag. What do you suggest?

  1. Vacuum Bag ClosureA large project going into a large bag should be the work of two people. Get a hand from a friend or spouse to help get the project loaded.
  2. Consider cutting off the seal on the far end of the bag. It is much easier for two people to load the project when one person can help pull it in from the other side. To make this work, you'll only need to purchase a second bag closure.
  3. Do not use a top platen/caul. Instead consider using breather mesh.

(Back to top)


VB7: What can I do to make my plastic bag closure easier to snap onto the bag?

A light coat of car wax or a wiped-on coat of silicone spray will make it easier to snap the bag closure over the vinyl or polyurethane vacuum bag. Be certain that neither of these products is accidentally applied to the inside of the bag where it could foul the work piece for finishing.

(Back to top)


VB8: How do I attach my existing vacuum press to the VeneerSupplies.com vacuum bag?

If you already have a vacuum press from another manufacturer and it uses a direct tube-to-bag connection, you'll need to attach our lock-on connector. Check the inside diameter of your existing soft tubing. It should be 1/4" or 3/8" inside. Using that info, you can select an appropriate barb fitting adapter for the lock-on connector. This is all you will need to convert your existing vacuum press for use with the VeneerSupplies.com vacuum bags.

(Back to top)


VB9: Can I press multiple projects in a single vacuum bag at the same time?

Yes! You can place small projects side by side in a large vacuum bag. Use breather mesh over each project panel instead of a top platen. You can also stack identical sized projects on top of one another if you place a piece of wax paper between them. This will prevent glue squeeze-out from bonding the panels to each other. Be careful not to stack so many panels inside that the bag seams are stretched.

(Back to top)


VB10: What size bag can I use with my vacuum press?

Ultimately, the speed of vacuum flow from your vacuum source is what determines the maximum bag size that you should consider. If your system is underpowered, the bag will not pull down fast enough and the glue will set up before full pressure is on the veneer.

Vacuum Flow
Maximum Bag Size
For Flat Projects
Maximum Bag Size
for Curved Projects
1 CFM
4' x 4'
2' x 4'
3 CFM
4' x 8'
4' x 4'
5 CFM
4' x 15'
4' x 8'

Learn more by clicking here.

(Back to top)


VB11: Why does it seem like your platen system is different from everyone else's?

There are several ways to build and use a platen system in a bag. I've never understood why some make it so difficult. My method allows you to veneer both sides of the panel at the same time. If you want to use two platens as shown here, you just groove the outside faces of each and use a spacer block to fill any gaps between the two platens. But by far the easiest method, is to use breather mesh. In this case, you only need a bottom platen. It does not need grooves and you can still press both sides at the same time.

(Back to top)


VB12: Why do I have to leave the bag connected to the vacuum press after it pulls full vacuum?

No matter what anyone says, a perfect seal on a vacuum bag is virtually impossible. Here are some things to consider.

  • Sometimes the bag closure doesn't seat perfectly across the opening.
  • Sometimes the bag stretch a bit after full vacuum is created and will then need a bit of additional vacuum. This happens most often when there is a large project in the bag. You'll hear the vacuum system cycle off (if you have any auto-cycling system) and then turn on again for a few seconds. After that, it may not cycle again for several minutes or even hours.
  • After many uses, some bags develop pin holes which can be hard to find. In those cases it's best to let the vacuum press keep the bag vacuum under control.

If the vacuum system is disconnected from the bag, you won't know if there is a leak because there is no vacuum gauge on the bag. If the bag is connected to a vacuum press system, you could easily see the vacuum level by looking at the gauge. The vacuum inside the system is the same amount of vacuum inside the bag. If your vacuum press cycles on and off too frequently during a project pressing, you'll know there is a leak and if you can fix it. However if you can't fix the leak, at least the vacuum system will keep manage the vacuum in the bag until the panel is finished.

(Back to top)


VB13: How is the CFM of the vacuum source related to the size of the vacuum bag?

A small vacuum pump will take a long time to pull a decent amount of vacuum on a large bag. The correlation between the vacuum source CFM (cubic feet per minute) and the bag size is simple. If the pump is too small and the bag takes too long to get adequate pressure, then the veneer glue could start to set up before the veneer is flattened by the pressure inside the bag. The result could be ripples in the cured veneer panel. To work around this, you have some options.

  • Work Fast - Once the substrate is glued up and the veneer is set onto the substrate, get the project into the bag as quickly as possible so the glue is still wet when the full vacuum is applied.
     
  • Chill Out - Try to get your shop temperature down (temporarily). Cooler temperatures slow down the setting of the glue. Don't go below 60° F or the glue may not cure at all.
     
  • Down-Size - Consider using the smallest bag possible for your project. While a large bag will work for a small project, it will also create more air space that must be evacuated.
     
  • Upgrade - Though an expensive option, you can always buy a larger/faster vacuum pump to get the bag pulled down faster.

More information about sizing your vacuum pump to the vacuum bag for your project can be found here.

(Back to top)


VB14: Where can I find a 4' x 8' vacuum bag with the opening on the long side of the bag?

You'd have to make your own vacuum bag with vinyl material and vinyl cement. Overall, I don't think it would be worth the trouble unless you truly can not load your project into the four-foot side of the bag.

The biggest problem would be finding a closure for the eight-foot side. I don't know where you could find something like that and I don't think butting two closures side-by-side would be very effective.

(Back to top)


VB15: How can I determine if my project is too wide or tall for a vacuum bag?

There are times when you may need to put a relatively large project inside a vacuum bag. Most vacuum bag suppliers offer a 54" maximum width on their bags. You can visually determine if your project is too big for a vacuum bag by using the string theory below.

You can determine if your project will fit inside a 54" wide bag by cutting a piece of string that is 104" long (or double the width of the vacuum bag minus 4 inches). Tie the ends of the string together so you have a string loop. Find of the area of greatest girth on the project. Drape the loop over and around the project. Now simply imagine that the string is a cross-section of the bag. Use pieces of tape to hold the string against each side of the project. Do this all the way around the project so that there are no gaps. This will help you visualize the way the bag will pull onto the project. If you can apply pieces of tape to hold the string against each part of the project, then it should fit inside a vacuum bag.

If there are gaps where the string will not lay flat against the project surface because there is not enough string left, then the project is too large for the bag.

(Back to top)


VB16: Will I foul up the finish if a coat of paste wax is applied to my platens?

I've never had any finishing problems caused by waxing the platens. Just be sure to let the wax dry and buff it out with a dry rag. Any sanding that you do to the panel after pressing will remove surface contaminates.

(Back to top)


VB17: How do I know that I'm buying a decent vacuum bag?

Some companies extol the virtues of their vacuum bags based on the width of the weld at the ends/seams, but it is the quality of the weld that matters most. A perfect weld that is 1/4" wide is better than a weak weld that is 1" wide. The vacuum bags offered at VeneerSupplies.com have a very high quality 5/8" wide weld completed with a 7,000 watt radio frequency welder.

Companies that are using "cold-weld" or "hot-air" techniques are using the wrong equipment for the welding process. That type of machinery is designed for low-cost surface bonding where the seam does not have to be air tight (such as in making tarps). The bags sold at VeneerSupplies.com are welded with radio frequency equipment because it melts the seams together under significant pressure. This method creates a seam that is stronger than the bagging material itself. It is the same method used to make drum liners for hazardous materials where a leak could be disastrous.

(Back to top)


VB18: If I use a large vacuum bag for a small project, do I need to seal off the unused area inside?

Generally speaking, there isn't much "loose" or "free" air inside the unused part of a vacuum bag. If you are using a large bag for a small project, there is not much to be gained by closing off the unused area with a secondary bag closure.

(Back to top)


VB19: Can I use PVC cement from the plumbing aisle of the hardware store to make a vinyl vacuum bag?

I've tried the Oatey brand with the vinyl material I offer on my website and it did not make a very good bond. Instead, I suggest using a cement designed for flexible vinyl material. You can find it on Amazon. I recommended HH-66 for a very long time, but it is so expensive now that I believe there are better vinyl cement options out there.

(Back to top)


VB20: Can window screen material be used as breather mesh?

Window screen material can create a pathway for the flow of vacuum and several users have sent messages saying they had no issues other than a moderate increase in the amount of time it took to draw full vacuum in the bag. It is important to know that a veneer that is not completely flat is not likely to flatten under window screen material; you can get lumps in the finished panel.

The other issue is that any adhesive that bleeds through the veneer will smear back onto the surface of the panel. Dedicated breather mesh has a much wider/open weave than screen material so glue that comes through the veneer (especially for porous species and burls) beads up and can be easily scraped off. I've also found that breather mesh is much easier to slide into the vacuum bag than screen material.

(Back to top)


Miscellaneous Questions

M1: I'd like to use a refrigerant compressor from an old air conditioner. How do I make the connection from the compressor to the first part of the vacuum press?

It can be difficult to find fittings to make that first connection. I've found two decent solutions that work on most of these pumps. First I want to remind anyone using a refrigerant compressor to please have the refrigerant professionally withdrawn from the system before you remove it from the equipment. The freon inside is horrendously harmful to our atmosphere. It's not worth the weight that will sit on your shoulders when you see how much refrigerant will come out of even the smallest system.

If the copper tubing on the refrigerant compressor is reasonably close to 1/4" outside diameter, you can make an easy connection to the first component of the vacuum press (either the reservoir or the Mac valve) by simply sliding a piece of 1/4" inside diameter vinyl vacuum tube over it. On the other end of the tube you can attached a brass barbed fitting to get to 1/4" NPT threads. If the vacuum tubing doesn't quite fit, you can heat it in hot water to make it more flexible and it will slide on easier.

If there is no way to get the vacuum tube connected directly to the copper tubing on the compressor, you can take the pump to the hardware store and find the closest matching brass component (with 1/4" NPT threads) that will fit over the copper tubing and bond it on with JB Weld. Yes, this really works very nicely!

Air Conditioner CompressorFrom Jim Wilson
"One of the obstacles I encountered was the 5/16" inlet line -- I couldn't find anything in that size locally, except compression fittings, which I wanted to avoid. Finally, I reamed a short piece of 3/8" refrigeration tubing to 5/16", soldered it to the inlet, and viola -- the inlet was resized to 3/8" OD. From there, the plumbing was easy."
 

(Back to top)


M2: What kind of refrigerant compressor (from a refrigerator, freezer, etc.) works best and what brand should I look for?

Each refrigerant compressor is different. Some compressors won't be able to pull the amount of Hg you'll need to do the veneering. The brand and size of the compressor is no indication of its speed of air evacuation or its maximum vacuum level. The only way to tell is to rig a vacuum gauge to it and see.

Also, some refrigerant compressors can restart under pressure and some can not. My experience is that most will restart under pressure. Again, you'll need to test this out for your individual unit. To incorporate a refrigerant compressor into a system, you'll use the basics of the instructions found by clicking here.

The only tricky connection is getting the copper tubing on the compressor to fit to a standard NPT thread. You'll still need the vacuum reservoir, gauge, tubing, vacuum controller, and some other miscellaneous stuff too.

Information from James Redmon and Tim Cook (click here for more)
"It seems that the newer compressor units (short barrel shaped ones) do not stand up to continued use in this way. Most all of the people have reported that they run fine for about 15-20 mins then burn out. In contrast, folks that use the older "cough-drop" shaped vertical unit like the one I have seem to have no problems at all and report great results. So, my advice is to look for this specific style from a repair shop or junk yard and not waste time on the newer models."

(Back to top)


M3: I'd like to use a refrigerant compressor for my system. Will the lack of oil in a compressor pump cause the unit to eventually burn out?

Yes, the lack of oil may eventually wear down the pump. I used a refrigerant compressor for vacuum many times and the compressor held up fine. Maybe adding some oil from time to time would lengthen the life of the compressor. Also, be sure that you leave 8" of copper tube from the exhaust of the compressor (bent upward). This will help to keep the oil in the compressor.

(Back to top)


M4: Do you have any information about converting copper tubing to work with threaded fittings?

Here is an article by George Kekenes that discusses some options when working with copper tubing.

(Back to top)


M5: When vacuum clamping, how do I ensure a good seal on porous woods like mahogany?

There are a few options here. Test each to find which one works best for you.

  1. You can substantially reduce the effect of the wood's porosity by coating the clamping area of the block with a coat or two of shellac.
  2. Consider attaching a non-porous scrap such as HDPE to the bottom of the carving block with screws. Then clamp it to the bench with vacuum.
  3. Apply duct tape to the vacuum side surface of the project if you plan to remove it quickly immediately after clamping
  4. Apply clear packing tape which doesn't hold to the wood quite as well but is easy to remove even if you let it sit for days.

(Back to top)


M6: How do I connect one of the VeneerSupplies.com vacuum presses to a OneWay vacuum chuck?

A customer recently emailed me and said that the OneWay vacuum chuck has a 1/4" NPT fitting on it. He simply removed the stock fitting from the chuck and replaced it with a vacuum clamping fitting from VeneerSupplies.com. This fitting is available with a 1/4" NPT male thread. The opposite end of the fitting attaches to the lock-on connector that comes with the vacuum press.

I do not claim that any of the vacuum press kits or vacuum sources offered at VeneerSupplies.com are safe or suitable for use with vacuum chucking.

(Back to top)


M7: Can I use a venturi system for vacuum chucking on a wood lathe?

A venturi based system might not be a good idea since it would cycle on and off to maintain pressure. These cycles can be problematic if the project piece is very thin at the mounting point. The fluctuations of pressure can cause the project to flex which can not only change the shape of the turned project as its is spinning on the lathe, but can also weaken the area that is attached to the chuck.

Because of this, I recommend using a vacuum source that maintains a stable level of pressure.. Of course, you can use a venturi for this but it will cause your air compressor to run almost non-stop. And if the air compressor cant keep up with the flow required by the venturi to maintain vacuum, then it's possible that the work piece could fly off of the chuck and wreak havoc.

I do not claim that any of the vacuum press kits or vacuum sources offered at VeneerSupplies.com are safe or suitable for use with vacuum chucking.

(Back to top)


M8: What is your favorite kind of cookie?

I'm a big fan of brown sugar so I love chocolate chip cookies made without chocolate chips. Without the chocolate, the brown sugar taste really comes through. I enjoy this with a glass of milk or a can of Yoohoo that has been in the freezer for 20 minutes before serving. Yummmmy!

(Back to top)


M9: How much vacuum is needed for vacuum clamping?

This is a hard question to answer because it depends on the size of the project panel and what you are doing with it. Ideally, you should get at least 18" of Hg if the project is just being sanded. For routing, you'll want more vacuum or a larger surface area. You can always test the strength of the clamping force by tugging on the panel and judging if that feels like enough clamping strength.

(Back to top)


M10: What if I can't get adequate vacuum to clamp the panel safely?

Consider finding the source of the leak. In many cases, the leak is caused by pores on the project material. MDF is very porous. Some species of wood such as oak and walnut are also very porous and will leak a lot of vacuum thereby reducing the clamping strength. I've had success putting masking tape on the back of the project board. This closes off some of the leak and increases the clamping strength.

Also be sure that you work bench surface is not porous as the back side of the clamping jig is using vacuum to secure itself to the work bench.

(Back to top)


Troubleshooting

T1: I hear air leaking from the bag stem connector. What should I do?

It's commonly thought that the sound of air flow in the vicinity of the bag stem and bag connector junction is a leak. If the sound from the bag stem area is not a clear "hiss" but instead sounds more like a combination of hiss and static (as on a poorly tuned radio station), then the leak is probably coming from a hole in the bag or from the bag clamps not being tightened adequately. Actually, what you are hearing is turbulence of the air going through the stem and lock-on connector toward the vacuum press system. You can simulate this sound by turning on your system and leaving the bag end unclamped.

You can further test the connection by placing a piece of duct tape inside the bag over the bottom of the bag stem (covering the entire stem base). Then attach the connector and turn on the pump. If you do not hear any sound near the stem, then the air you had originally heard was air flow as described above and you probably have a leak in your bag.

Please note: The vacuum connector does allow air to flow when it is not connected to the vacuum bag stem. It does not contain a valve inside since it isn't necessary for optimal vacuum operation.

(Back to top)


T2: D'oh...I punctured my vacuum bag or I have a leak somewhere. How do I fix this?

To find the leak, slide some paper inside the bag near the edges and insert your platens. Now place more paper near the bag stem and some in the vicinity of the bag closure. Close the bag and turn on the press. Allow the bag to develop some pressure. Then spray the edges of the bag with water. You should be able to see the leak if the paper becomes wet. Any leaks in the bag will show up as the water is absorbed by the paper. If not, try spraying water around the bag stem and the bag closure.

Helpful Ideas
You may find it easier to add a little food coloring to the water before spraying the bag. This will dramatically improve the visibility of the leak. I've also found that brown kraft paper shows the water results very well.

If you notice the leak while the press is running and need a quick fix, just place some clear packing tape over the hole and press it down firmly.

For a more durable patch, cut a piece of vinyl about 1" square and attach it to the outside of the bag with vinyl cement. Don't forget to prepare the patch and the exterior of the bag. Using acetone or xylene, clean the surfaces where the patch will be placed. Very fine steel wool will aid in the cleaning process, but you must be sure that no steel residue is left when you are finished. Apply the patch and press it down using a seam tool. Then turn off the press and allow the patch to dry over night. Patch kits are available on the VeneerSupplies.com website.

Vinyl patch kits used for repairing swimming pool liners also works well on vinyl vacuum bags.

(Back to top)


T3: How do I make my vacuum bag last as long as possible?

A vacuum bag will last much longer if you take good care of it. There are three important and easy to remember aspects of making a vacuum bag last for a very long time.

  1. The first is to store your vacuum bag away from UV sources such as sunlight.
  2. Make sure there are no sharp edges inside the bag. This includes the platens and the project panels.
  3. Be careful that you do not stress the seams on your vacuum bag. The seams will surely break if they are being pulled apart by vacuum. With a bag of the correct size, the seams will pull together. Imagine a very small project inside a large bag. Under pressure, you would notice that the seams actually pull together and are under virtually no stress.

Vacuum Bag Usage
The drawing at the top of this image shows a project being used in an appropriately sized vacuum bag.
The bottom drawing shows a bag which is too small for the project.

(Back to top)


T4: How much vacuum leak should I expect?

The typical auto-cycling vacuum press system recharges the vacuum every 15 minutes. This is just an average and it's based on the vacuum valve being closed so that no vacuum is directed to the vacuum bag. However, some people get a perfect seal and the system does not leak down for 24 hours or longer. How much fiddling you want to do to get a longer "off" time is up to you. Some people go nuts with it and others dont seem to worry about it at all.

(Back to top)


T5: How can I find leaks in my vacuum press?

Soapy water and compressed air can help identify the source of a leak. First, remove the vacuum line to the vacuum controller and seal the end of the tube with tape or other means of plugging the end of the tube. Then remove the vacuum gauge from the system. You will need need a 1/4" NPT brass plug to close the port on the manifold where the gauge was located. This plug can be found at most hardware stores.

Reminder: The vacuum controller and the vacuum gauge will be destroyed if pressure is applied to them so they must be removed from the system for this type of testing.

Now remove the bag (lock-on) connector from the vacuum line. You'll now need some soapy water in a spray bottle. With the system unplugged for the power source, spray the soapy water onto the components of the manifold assembly and the reservoirs. While still wet, use an air compressor to apply no more* than 10 PSI into the system through the vacuum tube and into the vacuum press system. If there is a leak, the soapy water will bubble up. If bubbles appears on the brass fittings, you may need to disassemble the system and tighten the brass fittings. If the bubbles appear at the ends of the PVC caps, apply PVC cement to the area around the edge of the PVC caps on the pipe and allow the unit to sit for an hour before testing again.

*Warning: Do not use more than 10 PSI of pressure. Failure to heed this warning could result in an explosion.

Tip: When I've been too lazy to pull out the air compressor to do this trick, I just blew into the vacuum tube using good old fashion lung pressure. It's not a pretty sight but it did work for me.

(Back to top)


T6: I just wired my system as shown in the directions and it's not turning on. What should I do?

When the vacuum controller is first installed, it may respond in a way that makes the user think it is defective but typically it's just a case of user error.

The most common user error is expecting the vacuum controller to be set to the correct vacuum cut-off level from the factory. Adjust the vacuum cut-off level by removing the plastic cap on the top of the vacuum controller. Counter-clockwise turns of the screw will increase the amount of vacuum required before the controller will turn the system off. I've found that 21" of Hg is when there is about 1/8" of thread showing above the adjustment screw. Re-attach the plastic cap to the vacuum controller when the desired vacuum level adjustment is set.

The second most most common cause of the appearance of a defective vacuum controller occurs when the wires are attached to the wrong terminals on the unit. The "common" terminal is hidden under the removable plastic shroud on the vacuum controller. When it is hidden, user mistakenly attaches the two wires to the "normally closed" and "normally open terminals". The correct wiring should be to the common and normal closed terminal. Be sure to remove the plastic shroud and apply the wires to the correct terminals.

(Back to top)


T7: How do I reset the vacuum gauge so the needle reads zero when there is no pressure on it?

Vacuum gauges often develop internal pressure during shipment (air shipment) which must be released for the gauge to remain accurate. Simply insert a small pin under the rubber stopper on the top of the gauge. Any inside pressure will escape and the needle will reset to the zero position. If you have a glycerine filled gauge, be sure to do this while the gauge is in the upright position to prevent the loss of fluid.

Do not press to hard on the rubber stopper. If you do, you could accidentally push the stopper inside the gauge.

(Back to top)


T8: My system is complete and it holds pressure perfectly after the pump cycles off but it takes a long time for it to shut off and I can't get it any higher than 21" of Hg. Why is that? 

There are three possible reasons for the lack of pulling power.

  1. You are at a high altitude.
  2. The pump is needs to be replaced or rebuilt.
  3. One of the connections between the pump and the check valve is leaking air.

The most likely reason is #3. You can test the pump simply by attaching the gauge directly to the pump. If it quickly pulls 25" or more, then you have a leak between the pump and the check valve.

(Back to top)


T9: My system was running fine for years but recently it started to cycle on and off very frequently. How do I fix this?

Debris in Check ValveCheck the check valve. The most likely culprit is debris caught under the seal inside. To fix it, simply remove the check valve from the system and blow air compressed through the check valve. Reinstall the check valve and your system should cycle perfectly. Thanks to John M. Petti for the picture and FAQ suggestion.

(Back to top)


T10: My glycerin-filled vacuum gauge has an air bubble in it. Is it defective?

Nope. All manufacturers of glycerine-filled gauges ship them with an air bubble inside. I have been told that this is done to keep the gauge accurate at all altitude levels and to prevent leakage during air shipping (when the boxes of gauges could be 40,000 ft in the air). A few users have reported that they were able to fill the gauge with more glycerin that they found at their local pharmacy. I don't necessarily recommend this.

(Back to top)


T11: Why does my auto-cycling system require me to tap on the vacuum controller to get it to cycle off sometimes?

The issue is not caused by the vacuum controller. It is the effect from another problem. There are two typical scenarios where this happens.

1. Carbon will build on the switch contacts inside the vacuum controller
if the pump is drawing more amps at start up than the 10 amps that the vacuum controller can handle. This causes the contacts to stick. The solution is to use a relay do to the high-current switching. You'd also have to get a new vacuum controller but you will not likely have this problem again once this change is made.

2. The vacuum pump is being "asked" by the vacuum controller to deliver a higher vacuum than the pump can offer. In this case, the vacuum source (either a vacuum pump or a venturi) typically has some sort of issue which is preventing it from achieving full vacuum. It may be able to achieve slightly less vacuum than what the controller is asking in order for it to switch off the system.

  • For a vacuum pump, the most common cause is a clogged exhaust muffler. If your pump has a bronze muffler with hundreds of tiny metal "beads", then simply remove it and soak it in denatured alcohol or lacquer thinner and then blow it out with compressed air.
     
  • For a venturi (assuming that the air compressor is delivering enough air) the most common cause is debris caught inside the mesh screen at the intake port of the air valve. Simply remove the compressed air fitting from the intake port of the air valve and clean the screen inside.

(Back to top)

Yes, Joe is a practicing Catholic
 
 
© 1998-2023 JoeWoodworker.com
Terms & Conditions
Privacy Policy