JoeWoodworker
JoeWoodworker Veneer
The Official Website of this Non-Professional Woodworker ™

Part 1
Introduction

Welcome
Veneering Basics
14 Good Reasons
Vacuum Press Uses
Vacuum Press Options
Questions & Answers
___________________
Part 2
DIY Vacuum Press Plans

Vacuum Press Chart
Project: EVS™
Project: EVS-2™
Project: V4™
Project: CRS™
Excel 1™
Excel 3™
Excel 5™
___________________
Part 3
Vacuum Bagging

Vacuum Bag Basics
Polyurethane vs. Vinyl
DIY Vacuum Bags
Connect the Bag
Bag Closures
Bag Platens
Breather Mesh 
Maintenance
DIY Frame Press
___________________
Part 4
Veneering Information

About Veneer
Veneering Glossary
Veneering Myths
Balancing a Panel
Veneer Glues
Veneering Tips
Substrate Materials
Flattening Veneers
A Sharp Veneer Saw
Jointing Veneers
Taping Veneers
Dealing with Defects
Curing Glued Panels
Veneering w/o Vacuum
Hammer Veneering
Iron-On Veneering
Veneer Storage
Amazing Bookmatches
Edgebanding Guide
Paper-Backed Veneer
   Guide

___________________
Part 5
Miscellaneous Info

Vacuum Press FAQ
Veneering FAQ 
Veneer Glue FAQ
Vacuum Forming
Vacuum Clamping Pedal
Vacuum Clamping Jigs
Vacuum Clamp Matrix
DIY Vacuum Manifold
Vacuum Press Gallery 1
Vacuum Press Gallery 2

VeneerSupplies.com


Vacuum Veneering - Tips, Tricks, and More!

Platens/Caul for the Vacuum Press

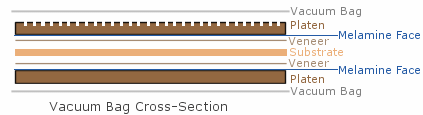
The platen system inside the vacuum bag serves two purposes. First, it helps to keep the veneered panel flat while the glue is setting up. More importantly, the grooves on the platen allow air to flow out of the vacuum bag to the vacuum source thereby creating an evenly distributed level of vacuum inside.

Breather Mesh Trick

Veneering with a two-piece platen system as described below is fine for small to medium size flat panels but it is a bit "old school". It's much easier to use breather mesh instead of a top platen. You can skip this page about two-piece platens if you are using breather mesh. Check out this article and give it some thought!

Platen Material

If you are not using breather mesh, you'll need to make 2 platens from ¾" melamine board. The benefit of melamine (instead of plain plywood or MDF) is that it prevents the veneered panel and any excess adhesive from sticking to the platens. A coat of paste wax will ensure easy removal of the veneered panel from the press. The wax will last though many glue-ups. You can find 4' x 8' white melamine sheets near the plywood aisle in most of the larger lumber and hardware stores like Home Depot and Lowes.

Vacuum Bag Cross Section

The platens should be at least 4 inches smaller than the inside measurement of the vacuum bag. This will prevent the vacuum bag from stretching at the seams which will cause the bag to split.

The bottom platen can have an optional border (approximately 1¾" tall) around the outside perimeter as shown in the picture below. This bordered bottom platen will help keep the top platen in place while in the press. The length and width of top platen should be 1/4" less than the bottom platen to allow easy removal after the pressing cycle is complete.

Platen Edges

You can significantly increase the life of the vacuum bag by easing the edge of the platen system (top, bottom, side edges) using a 3/8" or 1/2" radius round-over bit. Otherwise the sharp edges of the platen system can stress or even puncture the vacuum bag while under pressure.

Next, set your table saw blade to a height of 1/8", and cut grooves from the front to the back and side to side on the outside of the top platen. No grooves are needed on the bottom platen, though many users cut them any way. The spacing of the grooves on the top platen is not critical but a 1 to 3 inch layout works well. These grooves will direct the air to the bag stem and are absolutely necessary. Remember, these grooves are on the outside when you place them in the vacuum bag.

Vacuum Press Platens
The completed platens for a 2 x 4 vacuum bag

Platen Spacer Blocks

You may have an issue if your soon-to-be-veneered panel leaves a gap of 2" or more around the border. The top platen will cave in around the edges of the substrate while under pressure. To remedy this, simply cut a few extra pieces of the substrate material and use them as spacers between the two platens. Be sure these spacers are the same thickness as the substrate being glued to the veneer.

The Platen Concept


Next Page

Yes, Joe is a practicing Catholic
The Vac FAQ
Heat Lock Veneer Glue
© JoeWoodworker.com
Terms & Conditions
Privacy Policy