 |
 |
|
|
|
|
Part 1
|
Make Your Own Vacuum Bag
The vinyl can be often purchased from companies that make boat covers or canvas awnings. Surprisingly, some fabric stores also offer it. If you have a difficult time finding vinyl for the bags, it can be purchased at VeneerSupplies.com. There are a few different thicknesses available in vinyl membrane sheeting. The most common are 20 mil, 27 mil, and 30 mil. Either will work with similar results, but thicker material is typically more durable. Polyurethane bagging material is also available but, if you are building your first vacuum bag then consider building it from vinyl instead. Though the polyurethane will last longer, it is more expensive and can be more difficult than vinyl when making a DIY bag. One thing to keep in mind: the assembly process can be frustrating and time-consuming. If you are short on patience then a better option would be to buy a ready-to-run vacuum bag.
Tools and Parts
Getting Started For flat panels, start by determining the project size and adding 6" to the width and 12" to the length. Let's use an example project size that is 48" wide and 60" long. To make a custom bag for this panel, you will need two pieces of vinyl that are 54" wide and 72" long. The extra length allows room for the bag closure to be applied. As shown in the image below, the extra width allows the bag to pull together at the seam. If the bag is too small for the project (or the project is too big for the bag) then the seams will pull apart while under vacuum.
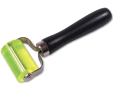
I think it's best to have about 1" of area where the vinyl will be bonded together to make the seam, so clean those areas with acetone or xylene. This must be done in a well-ventilated area. Don't forget that only three sides of each piece of vinyl need to be cleaned. The fourth side is left open so the project can be inserted. For a rectangular shaped bag, it makes the most sense for the open side to be one of the narrow ends of the rectangle. Don't bother to clean the side of each piece of vinyl material that will be the opening of the bag. Set the second piece of vinyl over the first piece on a smooth flat surface. Align the edges around all four sides. It is critical that the vinyl is kept flat with no bubbles or raised areas at the edges or in the middle of the bag. You'll want to start with a side of the bag that is closest to the opening and work your way around to the other side of the opening. Carefully lift the top layer of vinyl away from the bottom layer in increments of roughly 12 inches. Apply a heavy coat of vinyl cement to the edge about 1" wide and let the top layer gently rest back down on the bottom layer as you go along. Have a helper follow behind you with the seam rolling tool as the you perform this process. That person should roll/press the two materials together using very firm pressure with the seam tool. Continue this process around the bag until you reach the other side of the bag opening. Keep rolling the seam area for several minutes until the adhesive solvents flash off and the bond is made. Alternatively, some people have opted to use flat boards to clamp the seam for 30 to 60 minutes. If you are using polyurethane instead of vinyl, the seams will need to be very firmly clamped for 24 hours. Making the Bag Air-Tight: The Secret When at least 18" of Hg is achieved, use the vinyl cement to "paint" the outside edges of all previously sealed seams. Again, do this in a well-ventilated area. Vacuum will pull in the cement if any leaks exist. You might even hear the seam bubbling, and then just stop within seconds as the cement fills the void. Turn off the vacuum press and let the cement cure for another hour (or 24 hours if using polyurethane). A second application of cement may be necessary.
|


|
|
|